Pinterest

Follow Me on Pinterest

Saturday, July 30, 2011

QUILTING BASIC SUPPLIES

So many options:

When I first started quilting, I had a vague idea of what supplies I would need.  I knew that scissors, needle and thread were the basic supplies.  But now there are literally hundreds of items to choose from to make quiltin tastks easier, more accurate or more fun.  Once you'ved picked your fabrics and you're ready to start a quilting project, it's a good idea to collect the tools and materials you'll need.

FABRIC:
The best fabric for quilting is 100% cotton.  I learned that buying good quality fabric is very important in making sure that your quilt will last for a long time.  When you are working on a project, but a little extra fabric just in case you make a cutting error.  Also, once you start your project and you make a mistake, your fabric may not be available.

ROTARY CUTTERS
Rotary cutters have made quilting projects so much easier.  Their round blades cut strips, squares, triangles, and diamonds more quickly, efficienty, and accurately than scissors can.  Whenever I start a new project, I always change the blade.  I want to make sure that the blade is very sharp so that I don't have any distortions when I cut my fabric.

CUTTING MATS
Cutting mats come in different sizes.  I have one that covers my table so that I can cut easily my fabric.  I have a smaller one that I can take to class and cut my fabric there.  The cutting mat protects your work surface, it helps keep the fabric from shifting.  The mats come in grids with hash marks at 1/8" increments, and 45-degree and 60-degree angles.

ACRYLIC RULERS
For making perfectly straight cuts with a rotary cutter, choose a ruler of thick, clear plastic. Many sizes are available; a good size to start with is a 6x24" rectangular ruler marked in 1/4" increments.  There are many brand rulers.  I have several at home in different sizes and uses.  When I work on a project, I use the same brand ruler, for example, Omnigrid, in cutting my fabric.  I have learned that if I use one brand for cuttng and another brand also, there will be discrepancies.

SCISSORS
Make sure that you have one scissors that are to be used only for fabric and one only for paper.  Don't use your paper scissors for cutting fabric because in time, the edges will be dull.  Get your scissors sharpened when they don't work effortlessly anymore.  Any “catching”, rough spots or dullness that you can feel should be dealt with immediately.
MARKING TOOLS
There are many products available for marking sewing lines on fabric pieces or quilting designs on a quilt top. Marks made with special fabric markers are easier to remove after sewing and quilting. With any marking tool, work with a sharp point to get a fine, yet visible line.

TEMPLATE PLASTIC
A template is a pattern made from extra-sturdy material so you can trace around it many times without wearing away the edges. To make templates for hand- or machine-piecing, we recommend easy-to-cut template plastic. This slightly frosted plastic comes in sheets about 1/16" thick. What I use are the already acrylic plastic templates that come in different sizes and shapes.  These are the basic ones that I have.  As you will see, I have written the size it is and also put small sandpaper at each corner.  This makes the template stay in place as you are cutting your fabric.

IRON AND IRON BOARD


Have a good iron .  Pressing the seams will ensure an accurate block so there won't be any distortions.  You can also find small ironing boards that you can take to class if it's not provided for you.

SEWING MACHINE
A good quality sewing machine that will stitch a straight line and well adjusted tension will work for piecing.  Since I do a lot of sewing,  I take my machine about every six months for a cleaning and tune up. 

THREAD
For machine piecing I use 100% cotton thread.  If you use old thread, like I have, you will encounter problems.  Using old thread can be brittle and lose elasticity.  Hand quilting thread is stronger and thicker than sewing thread and should not be used in the sewing machine.  For mchine quiltng, use 100% cotton machine quilting thread, cotton- wrapped polyester quilting thread, or fine nylon monofilament thread.  There's a wide variety of colors that you can choose to fit your project and quilting design.

NEEDLES
The preferred sewing-machine needle for woven cotton fabrics is called a “sharp.” Sizes 75/11 and 80/12 are good choices for piecing, quilting, and binding most quilts. Use a smaller needle (70/10) if you’re piecing tightly woven batiks and a larger needle (90/14) for flannels. Dull needles can cause skipping or uneven stitches so it’s a good idea to insert a fresh needle at the start of every project.
For hand appliqué, most quilters like fine quilting needles. For hand quilting, use a “between” or quilting needle, which is a short needle with a small eye. Common sizes are 8, 9, and 10; size 8 is best for beginners.


SEWING FEET
The walking foot helps keeps long straight quilting lines smooth and pucker free.  The quarter-inch foot serves as the seam guide.  The one I have has a guide so that I have a true 1/4" seam.  The free motion foot allows the fabric to move smoothly to make your designs.
PINS AND PIN CUSHIONS

For piecing, fine glass-head pins, which allow you to press fabric pieces with pins in place and not melt the pins' heads. Use safety pins to hold the quilt top, batting, and backing layers together during machine quilting.


Pincushions are available in numerous styles, from the standard tomato shape so many of us are familiar with, to wrist, magnetic tabletop, and even decorative pincushions. Select a style that’s easy for you to use.


So now that you have your basic supplies, start on your project and enjoy the results.


Tuesday, July 26, 2011

QUILT DESIGNER

I have always marveled as to the creativity of the people that designs quilt.  I wonder how do they come up with the ideas of making beautiful quilts.  Few times I wondered whether I would be able to do that.  Well, I learned that I don't have that bent but I have been blessed with a dear friend who has that gift.

My friend's name is Ellen Murphy.  She has just recently put out eight original designs for quilts.  Her design company is called American Homestead. She is a very gifted lady.  In the two local quilt guilds, she has designed the Block of the Month.  Her instructions are easy to follow.  Below are pictures of her quilts that she has designed.  These quilts are at The Quilt Shopped in Anderson, Indiana along with the patterns.  So enjoy as much as I have.


The quilt pictured below Ellen designed it for the Shop Hop held July 9 - 13th. 


Ellen has a website where you can purchase her patterns.  The address is:
http://americanhomesteaddesign.com/

Her blog is:  http://americanhomestead.blogspot.com/

Tuesday, July 19, 2011

HUMMINGBIRDS

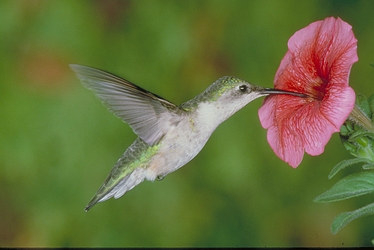
This morning I was outside working in my vegetable garden de-weeding.  A chore that I don't like to do but have to.  While I was de-weeding, I was visited by a ruby throated hummingbird. 


I love watching these birds as they come and pay me a visit.  I am amazed as to how fast their wings go.  I learned that the ruby throated hummingbirds are intensely inquisitive and are easily attracted to feeders, where males in particular typically display aggressive territoriality toward rival hummers, other birds, and even insects such as bees, butterflies, and sphinx moths. They quickly become accustomed to human presence, and will swoop down to investigate red articles of clothing, possibly as potential food sources.

The birds have visited my feeder from late July to October.  They need an ample supply of insects and nectar for food.  Tree are needed for nesting, resting and escape.  They have a high metabolism.  They can fly about 27 miles per hour and their wings beat 53 times per second.


I have several different types of flowers in my yard that has attracted these beautifu birds.  I've seen them on my petunias, morning glory, columbine, lilies, and beard tongue.

A good guideline of when to stop feeding hummingbirds is to leave your hummingbird feeder up for about 2 weeks after your hummingbirds have left for the season.  This will provide nectar for any hummingbirds that might have gotten a late start on their southward migration due to illness, injury or other reasons.

If you go 2 weeks without seeing a hummingbird in September or October, when hummingbird migration occurs across most of the United States, this might be when to stop feeding hummingbirds and take down your feeder until next year.

As the days get shorter, this decrease in the amount of daylight will trigger hormonal changes in the hummingbird that will cause them to migrate southward. So leaving your feeder up longer at the end of the season will not cause them to hang around longer than they should.

Now you should have a good idea of when to take down your hummingbird feeder and when to stop feeding hummingbirds.


Monday, July 18, 2011

EVERYTHING YOU NEED TO KNOW TO MAKE YOUR OWN TEA

I was never a tea drinker until I moved to Indiana twenty-eight years ago.  But now I love tea - cold or hot.  I found this article written by Amy Armstrong and I decided to share it with you.  So enjoy and drink a glass of tea.
***********************************************************************************

As working mom Karen B. asks, When is the right time have some "me time?" When there are always kids to deal with, how to you "switch off," as she puts it?
"Me time" may be a rare indulgence at this stage of your life, but that's no reason not to grab little moments here and there, as you can. Sometimes, just sitting down for a few minutes with a cup of tea amid the chaos of family life can steel you for the mom multitasking that awaits you.
Tea you make yourself is more flavorful than boxed varieties, and sipping a brew that you've made yourself, from start to finish, will make your tiny break feel sacrosanct. I've found that it's easier than it sounds, especially during summer: many outdoor summer gardens are amply stocked with the ingredients you need. Even if you don't have a lot of outdoor space, you can grow your own tea garden in a container. And if you aren’t a green thumb, you’ll easily find what you need at a local farmers market.
The next time you are in the tea aisle at your local market, take some time to check out all the ingredients in the teas offered there. Marie Hofer of Home and Garden Television notes that "you’ll find plants like lemongrass, spearmint, peppermint, rosehips and hibiscus. Can these be assembled in a garden? Absolutely. Most of these plants are ridiculously easy to grow.”

You Don't Need a Green Thumb

I can attest to that. Look, I don’t have a green thumb. I have a death black hand. I’ve killed more live plants given to me for Mother’s Day than anyone else I know. But herbs, veggies and fruits – now they a fighting chance with me. And preparing warm concoctions from these ingredients is much simpler than I thought it would be.
To make herbal tea, use one tablespoon of the fresh leaves or flowers. (If you are reading this in the winter and have shut down your garden production and or have dried the leaves, then use just one teaspoon because the dried plant material is more potent.)
Next you want to add your choice of herb(s) to a tea ball or to a steeping tea cup that is resting in the mug or cup you intend to sip from. Adding a natural sweetener at this point allows it to mix efficiently with the herbs. Pour hot – but definitely not boiling water – in the mug and let the mixture steep for five minutes. To flavor, add honey, lemon or sugar.

What to Plant

But how do you know which herbs to use? Follow your taste buds, and experiement. Hofer offers some prudent advice to novice tea makers: “Caution: If you're not used to drinking fresh herbal teas, start slowly. Make sure you know the identity of the plant you're using to make tea, and be watchful for adverse reactions. Finally, don't use any leaves or flowers that have been treated with pesticides.”

Chamomile

According to Planet Green, “Chamomile is known for its ability to soothe nerves, help you relax, and relieve stomach upset. The plants are very attractive, with tiny, daisy-like flowers covering the plants." Sounds pretty. It is. Mine are on the kitchen windowsill.

Mint

Mint comes in many varieties: spearmint, peppermint, chocolate mint and apple mint are all mentioned in the Planet Green article with a warning that mint is an invasive species and can “spread far and fast in a garden.” Best to plant it in a container to um, well, contain it.

Thyme

Thyme will help prepare your family for the coming cold season.“You may not think of thyme as an herb for tea, but if you suffer from frequent colds and sore throats, you might want to start. A tea made with 3 teaspoons fresh or 1 teaspoon dried thyme leaves does wonders for soothing a sore throat,” says Planet Green.

When to Harvest

Now that you have some ideas on what to plant, the next logical question is when to harvest. Portland's newspaper, The Oregonian, recommends picking leaves for tea as soon "as the plant starts to get bushy." In the case of chamomile, which is made from the plants flowers rather than its leaves, it's best to harvest them "just before they are fully open.”
Perhaps the best advice you can find on growing your own herbs will come from folks in your local area who are doing it. Most states have what is known as the cooperative extension service. It isn’t just for professional farmers. This agency – usually supported by the state’s land grant university system – provides information and support to home gardeners and can connect you with locals who have achieved the service's “Master Gardener” certification.

How to Throw a Tea Party

Now that you have your tea, what you need to do is have a tea party. But don’t just sit and sip on the couch; make it a celebration with your kids of the accomplishment of making your own brew.
Head back out to your garden or local farmer’s market to get some additional supplies, and get inspired by these great ideas from fellow moms.
“I put cut flowers from the garden in my silver teapot to use as the centerpiece,” shares Circle of Moms member Susan W. “I made menu cards trimmed out in fuzzy yarn to sit at each place.”
Rebecca A. helped her girls (ages 9, 7, and 5) host a glamorous tea party for friends. She "bought some old prom dresses on sale for dress up, as well as dollar store makeup, crowns and fake nails and nail polish,” she shares.
And Keri made tea party hats for her kids by glue gunning ribbons and silk flowers to inexpensive straw hats she found at Hobby Lobby for $1 each. "They were absolutely adorable in their tea party hats,” she writes.
Tah-dah, you have a beautiful tea party sure to make memories and the pride of knowing that the drinks being served are ones that you made it yourself.

Thursday, July 14, 2011

MOTORCYCLE ADVENTURES continue - PEOIPLE'S PLACE QUILT MUSEUM

DAY EIGHT

Well, this day in Intercourse, Pennsylvania Jorge and I went to the People's Place Quilt Museum.  The quilts were absolutely beautiful.  Here are a few of the quilts that Jorge and I saw.

The Postage Stamp Colorsplash quilt has 36 different fabrics.  The postage stamp sized squares made it possible to include two to three times as many different fabrics.  Each block is one inch square in size and each is squared to its neighbor.  All 5,329 squares are crossed, corner to corner.


The Bargello Abstract is a study of color gradation and results from a carefully orchestrated composition of fabric choices.  The contemporary variation of the more traditional bargello design shows peaks and sweeping curves, all in a simple double border of solid black and coordinating floral.

The Center Diamond is one of the oldest and plainest Amish quilt patterns and historically found almost exclusively among Lancaster County made quilts.  The quilt is awesome for its deep, rich colors and its lavish quilting done in black thread.  The lage cranberry square is tipped on point to form the central diamond.  The focal point is the quilting design.  The wide ourter border, typical of Lancaster Amish quilts, provides a final showcase for the quilted feathers, hearts, floral feathers and straight lines.


The Distant Trees quilt is an art quilt of contemporary design.  The front and back side of the quilt has its own characer.  The quilt blocks are constructed one at a time in an attempt to create a feeling of movement. 

Jorge loved the back part of the quilt better than the front.  I guess he likes the contemporary quilts more.  He still likes the traditional but I see a bent toward the contemporary.


This quilt is titled Ode to Jo.  The pattern requires half square triangles and basic squares to complete each of the 20 blocks.  As I looked at this quilt, I felt I was looking at a stain glass window.  The quilt was hung on the ceiling.  The sawtooth border is absolutely beautiful.

The Bargello Wave quilt has simple rectangular blocks of colored fabric, which appear to radually shift in size and placement.  The varying widths of the pieced blocks from a 1/4 inch sliver to  a 2 1/4 inch block make a gradual wave, sloping and shifting from left to right.  Both Jorge and I loved this quilt. 

The last quilt I want to share with you is title Confetti.  Imagine of just throwing a bunch of fabric squares up into the air and watch them fall.  That's almost the recipe used for this quilt. In spite of the crazy ramdomnness of the blocks, the quilt shows planning and organization.  There is an assortment of warm and cool colors in a full range of values for each block.  The white sashing defines the 30 blocks of Batiks.

We really enjoyed the museum and the wonderful quilts.  If you ever get an opportunity to go to a quilt show or museum, go.


Wednesday, July 13, 2011

MOTORCYCLE ADVENTURES continuing

Several days have passed since my last post.  Again, due to lack of internet access I am now recapping our trip at home.

DAY SIX

We are on the road heading towards Connecticut to visit dear friends.  We are taking country roads to get to our destination.  As we are traveling, we go through beautiful towns.  We loved the old houses that we saw.  We were able to see the cornerstone when the building was erected.  What we in Indiana think is old here is only young in the east coast.


During this ride to Connecticut, I see the Red Lion Inn.  This inn has been in existence since 1773.  We did not go in to eat or look the inside but the building does house the Country Curtains company.  Jorge came in with me to check out the curtains and he selected several that might go well with our bedroom.  It was great to see the curtains better than the catalog.


We arrive in Connecticut and spend two days with wonderful family.  The kids loved the fact that we came on motorcycle.  So on Sunday, Jorge gave their oldest daughter a ride to church.  Needless to say, she was a very happy young lady.


DAY SEVEN

As we leave Connecticut, Jorge surprises me and tells me we are heading to Lancaster, Pennsylvania to check out the Amish area.  Boy I was very happy.  Since it was Monday, I knew it was laundry day so I was hoping to see some quilts, but no such luck.  Either way, it was wonderful driving the countryside and seeing the Amish farms.


Tobacco grown by Amish farmers.
We toured an Amish farm and home.  We learned more about their lifestyle.  I admire their determination to live the lives they live.  I'm not sure I would be able to because I do like the modern conveniences.

Tomorrow I'll share about the quilt museum that Jorge and I went to.  Good night for now.

Saturday, July 9, 2011

MOTORCYCLE ADVENTURES continued

Due to the fact that internet access has been difficult, I've not been able to post about Jorge's and my adventures on our motorcycle.  So here is a synopsis of what we've done.

SECOND DAY

After we leave Kane Manor to get to Bennington, VT, we encounter something we've never had encountered before even in our car.  We are riding along as we see a wild turkey on the other side of the road on the shoulder.  Unfortunately I did not have my camera out for the picture.  But this silly bird decided that we wanted to get to the other side of the road.  Please don't forget that I mentioned that we are on the road.  It sees us coming and decides to take flight.  Wild turkeys don't fly very high.  Jorge and I duck quickly.  Unfortunately, I could not duck any lower and the turkey grazed my helmet.  That silly bird was fine and so were we but we had a good and hearty laugh for several minutes.  That could only happen to us.

As we reach Port Allegheny, PA we come across a barn with a beautiful quilt block on the side.  As Jorge does a u-turn, we tip over and fall.  I landed on my knee and the foot peg hit me on the back of my calf.  Thankfuly nothing serious happened and the bike was fine.  I did get the picture of the barn.


We keep riding till we get to Hoosic, NY.  There is a store there that is also a deli that is very unique.  It is all moose related,  Anything that has to deal with a moose they have it. 


DAY THREE

We are in Bennington, VT.  The night before we enjoyed the wonderful fireworks which we could see from our hotel.  I really had no desire to get on the bike and head on out to the park.  As we are preparing to leave, we come to the hotel's cat.  His name is Puddles and he was very cute.


Off we go to Manchester, NH to meet up with one of Jorge's former co-worker from Ruger.

DAY FOUR

One of the places that I wanted to go and see is the Joshua L. Chamberlain Civil War Museum in Brunswick, Maine.  On our trek there we go through Portsmouth, NH and see the North Church where it had some very famous dignitaries there.  William Whipple, John Langdon, Daniel Webster and President George Washington attended there.


We finally reach Brunswick, ME and we start our tour of the Chamberlain Museum.  We learned more about the man and grew to admire him even more.


We head on off to Camden, ME with friends and enjoy a wonderful dinner by the coast. The food was awesome but the weather was not.  It was pouring rain and we decided it was not a good idea to drive 3 1/2 hours back to Manchester.  So we stayed at a lovely little inn.

DAY FIVE

The next day we are on the road and head on off to Friendship Trap Company for a tour.  This is a small company that makes lobster traps.  These traps are not made out of wood like we've seen before. These traps are made out of steel wire covered in plastic.  We learned that the traps are customed made for each customer.  I was amazed at the amount of work that is involved in making a trap. 


We end our day by making it back to Newport, NH to Crow's Nest Campground where Jorge lived while he was working for Sturm Ruger in 2009.  We got to tour the plant and see the many changes that they have made, had a relaxing time at the campground and resting as we prepare to leave on Saturday for Brookfield, CT to see friends and make our trek home. 

This has been an interesting vacation and getting to see things that I never thought I would see before.  Can't wait to see what lies ahead before we get home.  Bye for now.